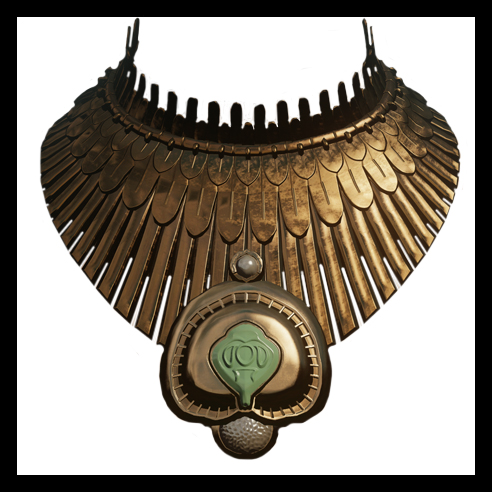
So this is a pretty intense creation. Lots of things going on, from huge focal thing to sticky up bits at the top. (Sub-goal, make it so the answer to the question”How did she die?” is not “Well she made a necklace with spikes directed at her throat and then nodded a bit too vigorously”)
This is just a primary planning post, working through some of the theoretical ideas to get some sort of scale for the project, so no mock ups or draughts yet just some maths.
Most other people who have made this costume have gone with making this out of plastic and spray painting it to give it the metallic look. This is probably the sane and cheap way to do it. However, I’ve never really used plastic before but I have done jewelry making before so I’m thinking about how I’d go about making this more traditionally.
Having said this, just stringing this would probably be problematic as the weight of the components would probably distort the shape. So I think making a fabric base that the pieces could be sewn to would help provide stability to the entire piece. Also it allows for the possibility of using an invisible separating zipper as the joining mechanism which would help provide the full coverage at the back.
Based on some very approximate measurements I made and guesstimating the proportions from the picture, the main part of the necklace will be about 4 inches long at the front, graduating to 2 inches at the side and back, with a circumference of 14 inches at the centre and 36 inches at the outside. The upright part will be 1 inch tall and have a circumference of 14 inches.
My original thought was to use all ready made beads and I found these which would be perfect for the smallest part of the main part. At 14mm wide I’d need about 36 to fill the distance. (Apologies for switching between metric and imperial, the tape measure I had on hand only had inches but the beads are sold in metric). Add to that another 36 to make the same distance around for the upright part and I’ll need about 80 of the scales. Strung together with some cylindrical spacers and jump rings and the first row is pretty straight forward.
Unfortunately for the larger components there isn’t really an existing product that will work so I think I’ll try cutting out the shapes from jeweler’s brass sheets. It should be thin enough that I can cut it with scissors and drill thorough it easily and for the most part I only need straight lines so shouldn’t need to do too much messing around with it.
So for the medium scales I’ll want them 14mm wide to match the size of the small scales and then about 50mm long. This should give enough room to lap underneath the small scales and still come down to about midway on the necklace. The medium circumference will be approximately 24 inches (720mm) so I’ll need about 52, which should fit on one 6″ x 12″ sheet.
For the long strips I’ll want them half as thick as the other scales so 7mm wide by about 70mm long, again to give enough length to lap underneath the other layers and to give the front the desired length. Obviously most of the strips will be shorter but if I make sure I’m allowing for the most possible now it should help avoid surprises further down the track. I’ll need about 136 to fit the largest circumference, which should require 2 6″ x 12″ sheets.
For the longer upright pieces I’ll want the at 7mm to match the long strips on the bottom, but only about 22mm tall (any more and the likelihood of impaling myself on my own jewelry goes way up).This will need another sheet 6″ x 12″ sheet.
Finally, the focal I think I will do out of polymer clay for shape, cover with metal leaf for finish and add a cabochon or focal bed for the centre.
So that’s the crazy pants plan for now, next step will be making a fabric mock up (nothing fancy, just a couple of large semi-circles) to get the shape and lay right, which I can then use to make a pattern for the fabric base layer, and to do a more accurate bead layout.
